LM389 is a low-voltage audio amplifier integrated circuit produced by the US company NS. It uses an 18-pin DIP dual in-line package and contains a power amplifier similar to the LM386 and three independent NPN transistors. Some of the limit working parameters of each transistor are as follows: Bvco = 12V, Bvcbo = 15, Icm = 25mA, Pcm = 150mW. The two-way wireless intercom circuit designed with LM389 is shown in the figure. The audio power amplifier is used for transmission and reception amplification. Among the three transistors, VT1 is used as a carrier crystal oscillator, VT2 is used as a carrier amplifier, and VT3 is used as a super-regenerative receiver detector. Adopt half-duplex communication mode, but there are two channels: the frequency of the first transmission and the second reception is 28MHz; the frequency of the second transmission is 29MHz. Therefore, it is easy to change to a full-duplex communication circuit that can listen and speak at the same time. The walkie-talkie adopts amateur frequency, does not affect other communication equipment, and can be used in teaching, tourism, construction sites, field operations, and occasions where mobile phone calls are inconvenient.
1 Circuit principle
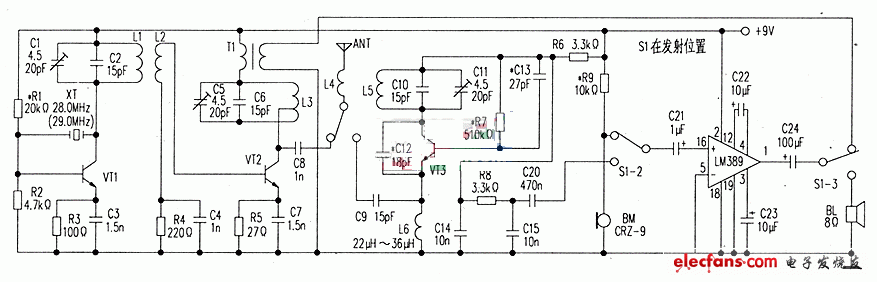
Quartz crystal XT, VT1, etc. constitute a high stability carrier oscillator. The oscillation signal is coupled from L1 to L2. The carrier power is amplified by VT2. C1, C2, L1 and C5, C6, L3 form two parallel frequency selection loops. When their resonance frequency is consistent with the XT natural oscillation frequency. The maximum transmit power can be obtained, and the general call distance can reach 2.5km ~ 3km. When S1 is set to the transmission position (the position shown in the figure), the audio signal picked up by the microphone BM is power amplified by the LM389 and added to the modulation transformer T1, and the working voltage of the carrier power amplifier VT2 is controlled by the level of the audio signal. Realize the amplitude modulation (amplitude modulation) of the oscillating signal, and then send it to the antenna ANT. Via C8 and L4 to transmit to space. R1, R2 decide, VT1 working point.
VT3 and other components form a self-extinguishing super-regenerative receiving detection circuit, which is determined by the parallel resonant circuit composed of C10, c11, and L5 according to the receiving frequency (that is, the transmitting frequency of the other machine). R7 is used to set the VT3 DC operating point, and determines the self-extinguishing frequency together with C13. This frequency should be higher than the audio frequency and lower than the carrier oscillation frequency, generally a few hundred kilohertz. The sensitivity of super-regenerative detection is very high, and the magnification of weak signals can reach hundreds of thousands of times. It is similar to the standard superheterodyne receiver with one-stage independent local oscillator, one-stage mixing, and two-stage intermediate amplifier, but its The selectivity and signal-to-noise ratio are slightly worse. R6 is the detection load resistance. The demodulated (de-carrier) filtered audio signal is filtered by R8, c14, and c15, and the power is amplified by LM389 to drive the speaker BL to sound. When the BL impedance is 8Ω, 450mV of undistorted output power can be obtained.
2. Component selection and production
The microphone BM uses CR2-9, 15, 16 and other domestic electret microphones. XT selects JA12 type crystal oscillator, the frequency is 28MHz and 29MHz, ANT selects 1.5m whip antenna. T1 selects the small input transformer of the ordinary transistor radio. It has a total of 5 wire ends. Two wire ends on one side are primary and three wire ends are secondary. Only the adjacent two are used. The other is empty and can be used. The cross section is 5mm & TImes ; 5mm E19 silicon steel sheet core is self-made, the primary is wrapped with Φ0.06mm enameled wire for 1500 turns, and the secondary is wound with the same wire for 500 turns.
Self-made L1 ~ L6: L1 and L5 use Φ0.4mm enameled wire to wrap 14 times on Φ8mm wire frame; L2 use single strand plastic wire to wrap 2 times on L1; L3 use Φ1mm enameled wire to wrap 10 times on Φ12mm wire frame. Center tap . Two wires can be wound around, and one is not needed: L4 is the antenna plus sense coil, which can shorten the length of the antenna after use. Use Φ0.71mm enameled wire to wind around 30 turns on the Φ15mm coil stand. L6 is a high-frequency choke coil, and can choose 226mH ~ 36mH finished inductor. s1 selects 3 & TImes; 2 compression spring type self-locking switch, the parameters of other components are shown in the attached drawings, no special requirements.
3 Commissioning methods and steps
(1) Use a 50kΩ potentiometer to temporarily replace the R1 of the armor. When adjusting the potentiometer from large to small, the VT1 collector current gradually rises to a certain value and suddenly drops. At this time, the XT is disconnected and the current rises again. Connect XT The current drops again, indicating that the circuit has started. Then adjust the potentiometer a little bit. Make the current drop by 1mA ~ 2mA again, avoid the strongest point of oscillation (the stability is poor when the oscillation is strongest), and then replace the potentiometer with the same value of fixed resistance. Adjust the second machine in the same way to make its carrier oscillator work stably.
(2) Use a 1MΩ potentiometer to temporarily replace the R7 of the armor. Adjust the potentiometer from large to small to make the super regenerative noise in the armor speaker BL the loudest. And there is no noise such as howling and popping (can be eliminated by adjusting C15) . Turn on the second machine to make it in the launching state, adjust the length or turn spacing of the C1, C2, C5, C6 and L1, L3 of the second machine. Then adjust the C10, C11, L5 and C12 of the first machine to make the super regeneration in the loudspeaker BL The noise disappeared completely. It became silent. When speaking to the microphone BM of machine B. The machine BL should emit a loud, clear sound without distortion, blocking, etc., indicating that the reception frequency of machine A and the transmission frequency of machine B are basically the same. Then gradually extend the distance between the two units (the distance between each extension is based on the slight over-regenerative noise of the machine BL), and repeat the above adjustment steps until the distance between the two units is the longest. Then replace it with the same value of fixed resistance Potentiometer. Use the same method to adjust the second machine so that the transmission frequency of the first machine is consistent with the receiving frequency of the second machine, and the call distance is the farthest.
Universal Series Extension Sockets
Socket Extension,Trailing Socket,Plug Socket Extension,Single Socket Extension Lead
Heikki Technology Co., Ltd. , https://www.heikkipower.com